Break Mac in Case of Emergency, A Theft Checklist
The recent parting of my Mom with her MacBook thanks to some S.O.B.’s that came into the house, reminded me stop postponing updating my MacBooks Air’s security settings.
Make no mistake, the steps below are less about having a hacker-proof system and more about making it a pain to an average user (or a scum-of-the-earth thief) to get to your information if your Mac is stolen1.
Anyways, my checklist:
Install Undercover:
You can skip this step, but I have this app installed on all my Mac’s (I didn’t on my Mom’s and I’ve kicked myself for the last week).
Visit the website for more info, but in a nutshell, it provides the closest thing to Apple’s Find my Phone on Mac. In addition, once you report it stolen, it enables some interesting psychological hacks to make the S.O.B. take it to a store, or try to sell it quickly.
Modify System Preferences:
Security:
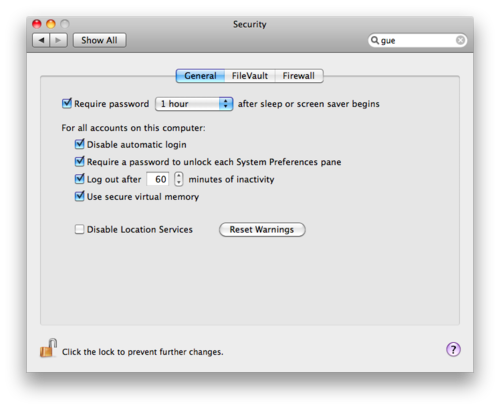
 Since I have MacBooks, it gets really annoying if the password prompt comes up every time I close the lid. The 1 hour setting is the best balance between convenience and security for me. The rest of the settings are pretty self explanatory.
Accounts:
 On
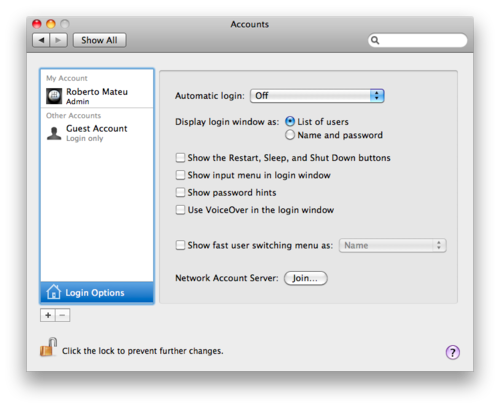
On Login Options turn Automatic Login Off. If you didn’t install Undercover, then change Display login window as Name and password rather than List of users like in my screenshot.
The difference is that with Undercover, you want to create a Guest Account to allow the S.O.B. to login to the Mac —so we can try to take a photo of him and track the laptop–. Otherwise, we want to make the S.O.B. need to guess both the username and password.
Change Folder Permissions:
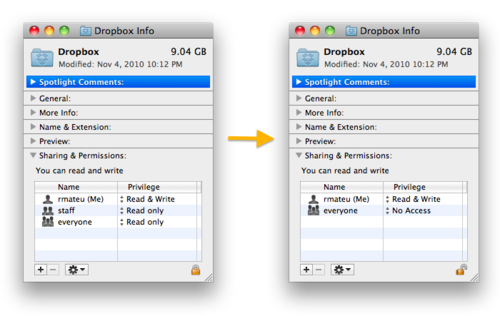
If you created any folder that isn’t inside the defaults under your username, or more clearly, alongside your Desktop, Documents, Downloads, etc, you need to modify its permissions since by default, they will be viewable by other users, or if your Mac is booted in disk mode.
In my case this is extremely important since I have pretty much everything I hold dear inside the Dropbox folder2.
 To do this, just right-click on the folder and select Get Info. At the bottom of the panel you’ll see the Sharing & Permissions group, modify as need to get it to look like the screenshot on the right.
With this we are all set.
Danger, Will Robinson!
Don’t forget, this is only some basic precautions in case your Mac gets stolen. A geeky enough person that can get his hands on your machine and has access to time and Google (which geeky people usually do), will be able to get to your files eventually.
But the assumption here is that your Mac was stolen for the hardware, not your data. These settings will make the Mac a pain to use, unless a new OS is installed from scratch —wiping your data.
Which, while sad, is what you rather want in this situation (after getting the Mac back, obviously).
-
If you really need some data private, put it on a encrypted disk (and for gosh-sakes, don’t save the password in the Keychain). ↩︎
-
We can argue about how secure is to put all your stuff online later. Remember, we’re focusing on analog S.O.B.’s. ↩︎